This post contains affiliate links.
Laminate flooring can be installed over existing floor surfaces and one of them is hardwood. However, there are a few conditions that should first be met before you can properly install laminate over existing hardwood floors.
Checking and verifying the conditions of the existing floor will be the first step on how to install laminate flooring over hardwood. Below is the complete list of the steps.
- Step 1. Check and prepare the wood floor so that it is in good condition for the proper installation of laminate flooring.
- Step 2. Prepare all the tools you’ll be needing for the laminate installation.
- Step 3. Remove any existing doors and moldings that will be affected by the laminate floor installation.
- Step 4. Clean and vacuum the existing hardwood floor.
- Step 5. Prepare and check the laminate flooring to be installed.
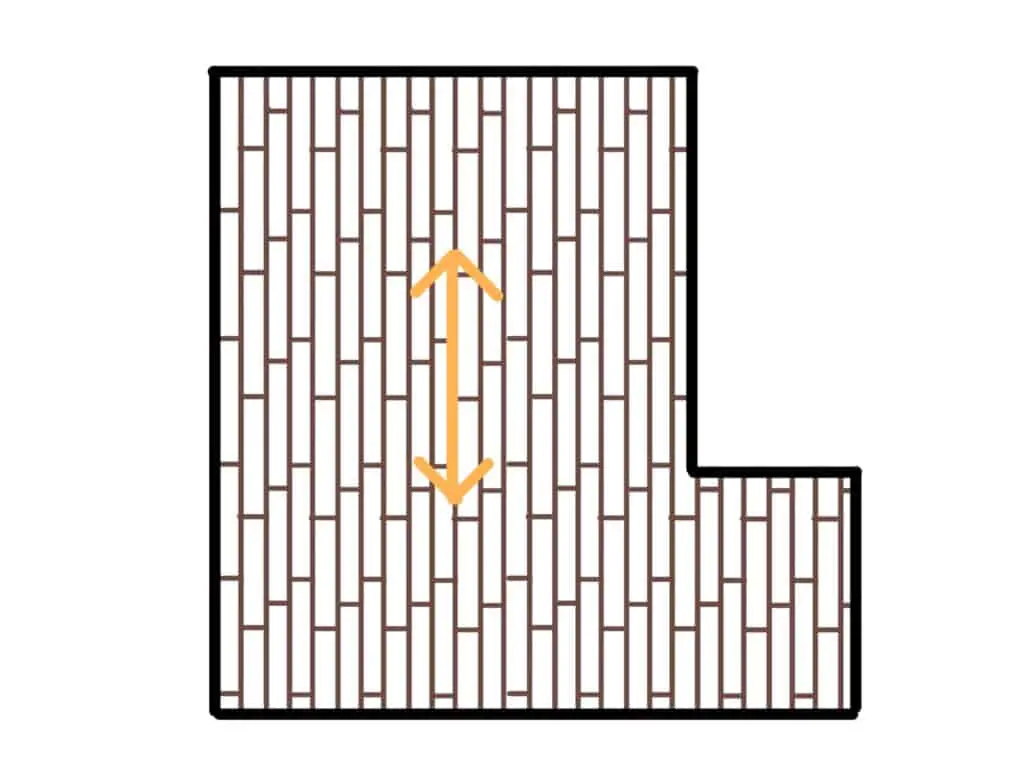
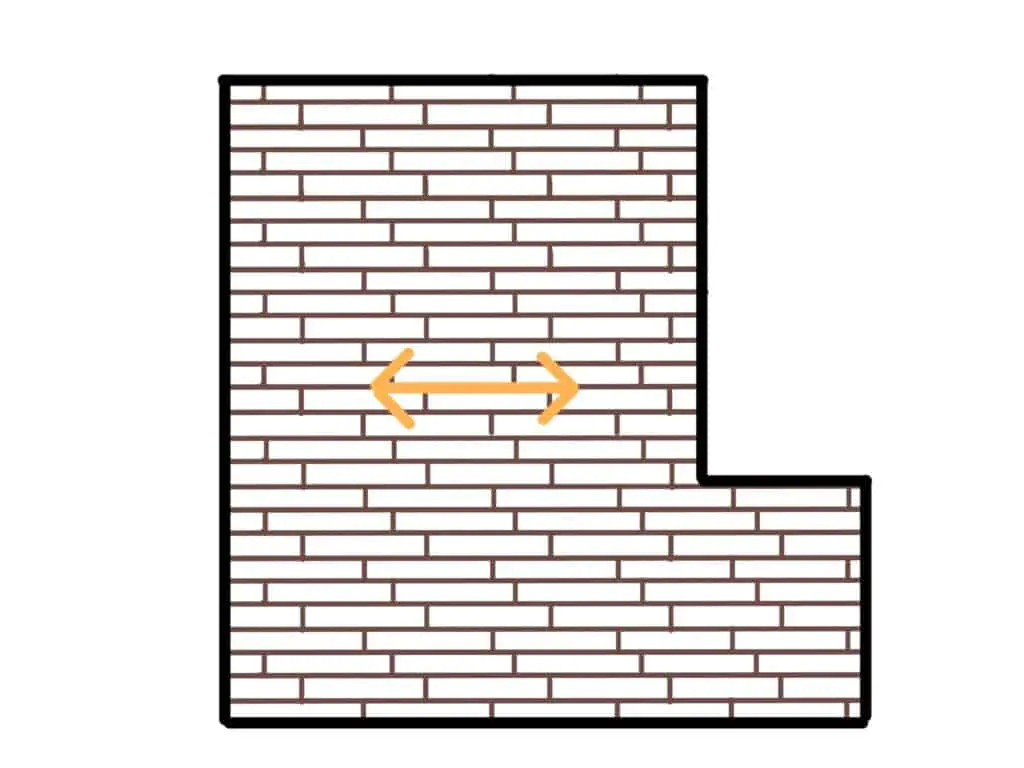
- Step 6. Decide on which direction and in what pattern you want to lay the laminate flooring.
- Step 7. Roll out the underlayment over the existing hardwood floor.
- Step 8. Begin laying down the first row of laminate planks.
- Step 9. Plan out the second and third rows of laminate planks, following the pattern you’ve decided in Step 6.
- Step 10. Continue laying more rows of laminate planks.
- Step 11. Install the last row of laminate planks.
- Step 12. Install molding over the gap between the laminate and the wall.
- Step 13. Install transition strips where the laminate floor meets another flooring.
- Step 14. Install back the doors that have been removed and adjusted.
- Step 15. Add caulking to neatly fill up the gaps in the floor, molding, and trim connections.
Laminate flooring is very DIY friendly and unlike other floors, you can install laminate even if you are a complete beginner. With regards to installing it over existing hardwood floors, there are just a few additional steps that you would have to do just to make sure you won’t have any problems with the installation. Once you’ve checked that everything is in order, you’re all set to go.
Step 1. Check and Prepare the Wood Floor So That It Is in Good Condition for the Proper Installation of Laminate Flooring
Before you even begin installing laminate flooring over your existing hardwood floor, you should first check the current condition of the wood floor. Make sure its condition is good and prepared well to accept laminate flooring.
A good base for laminate flooring should generally be stable, free from any movements, and flat.
Make sure the wood floor is fixed. You don’t want anything moving and everything should be tight. If there are any floorboards that have some movement, drive-in nails or screws to fix them in place. Once installed, your laminate flooring might not last long and the joints might break apart if the underlying wood floor has some instabilities.
Speaking of instability, make sure the existing floor is not engineered wood installed as a floating floor. You can’t install laminate, which is a floating floor, over another floating floor. Things may break apart once they move against each other. If you know your floor is an engineered wood floating floor, cancel your plan of installing laminate and revisit your other options.
After making sure the wood floor is fixed and tight, make sure the whole surface is completely flat. There should not be any height variations in any area of the floor. If you find any, you would need to sand them down, or in extreme cases, place a thin sheet of plywood or luan over the whole floor to have a good flat surface for your laminate to lay onto.
I recommend you check out the article can you put laminate over a wood floor. It will show you in detail the things you need to consider before attempting the installation.
Step 2. Prepare All the Tools You’ll Be Needing for the Laminate Installation
Below is a list of the common tools you’ll be using for the laminate floor installation.
- Safety Knee Pads – If you’re not used to working kneeling down it might be a good idea to get a good pair of safety knee pads. Since you’ll be kneeling down most of the time while working on the floor, the knee pads will provide some cushion and comfort while working on your knees.
- Hammer – You can use this to manually drive-in nails when you’re installing the shoe molding or quarter round molding. You’re also going to use this when using the tapping block or pull bar on the laminate planks
- Rubber Mallet – This is a safer type of hammer to use when tapping over the laminate planks.
- Pneumatic Brad Nailer or Pin Nailer with Compressor and Hose – This is used, as a faster and better option than hammer and nail, for fastening your moldings around the room.
- Tapping Block and Pull Bar – Used with a hammer or mallet to pull or push in laminate planks tighter.
- Utility Knife – An all-around quality knife for cutting materials.
- Tape Measure – Always an essential tool to have around for any construction work.
- Straight-Edge – A tool to help you make straight lines using a pencil or marker. Preferably metal so that it does not lose it’s straight edge easily but any straight-edged material will do.
- Pencil, or Marker – This is for marking down measurements.
- Circular Saw, Jigsaw, Miter Saw, Table Saw, or Handsaw – You can use any of these cutting tools to cut the laminate planks. You’ll also use them for when you need to cut off the bottom portion of a door.
- Prybar – This is optional but if you have protruding nails you need to remove, this tool will be very handy.
- Oscillating Tool or Dovetail Saw With an Angled Swinging Handle – This is used for cutting off door trims so that you can slide in a laminate plank underneath.
Step 3. Remove Any Existing Doors and Moldings That Will Be Affected by the Laminate Floor Installation
Since you’ll be laying laminate over an existing floor, you’ll be raising the floor a few units higher. Any of the doors in the room might hit, rub, or get stuck once the laminate floor gets installed. Check the bottom of all the doors in the room. There should be at least 1/8″ – 1/4″ or 3mm – 6mm gap between the door bottom and floor.
Remove any of the doors from the door frame that will be affected by the raised floor. Set them aside and prepare them for cutting. The amount that will be cut will depend on the thickness of the laminates, including the underlayment, that will be installed. Make sure you still have the necessary gap or space between the bottom of the door and the installed laminate.
Here’s a video showing how to cut down the bottom of the door.
If the room has an existing baseboard molding, you have two options. You can either reuse it, or to retain it and install a new shoe or quarter round molding over the corner gap in between the installed laminate and the existing baseboard.
For beginners, it would be easier to just retain the baseboard and to install a new shoe or quarter round molding but if you want to reuse it, here’s a video showing you how to remove the baseboard without damaging the wall.
Step 4. Clean and Vacuum the Existing Hardwood Floor
It’s easier to work without any furniture or unnecessary objects occupying the work area. So make sure to take out of the room anything that will interfere with your work.
Once the room is clear, start cleaning your wood floor. Use a broom and a vacuum to remove any debris and dirt on the surface as well as those that settled in the cracks and joints of the floor.
Since the laminate is a floating floor, as you walk over it, it will create air movements underneath that will allow any of the dust and debris, that you were not able to clean, to move around and you may hear some crunching sounds happening. So make sure to get the floor as clean as you can.
Also, make it a habit to sweep or vacuum every now and then while you’re installing the floor, just to make sure there aren’t any fresh dust that might get under your laminate.
Step 5. Prepare and Check the Laminate Flooring to Be Installed
Prior to the installation, laminate floors need to acclimate in the room. It takes around 2-3 days for the laminate floors to acclimate. This will help normalize your laminate planks to the normal conditions of the room. Otherwise, if you don’t acclimate laminate flooring and you’ve prematurely installed it, each laminate plank may expand or contract unevenly which could cause it to buckle or break away from the joints.
Here’s a good article explaining in detail why you need to acclimate laminate flooring.
Laminate flooring needs some kind of underlayment underneath it. It helps make the floor quiet to walk on, helps make the laminate flooring stable, and supports its joints as well.
There are several types you can choose from but for a wood subfloor, a foam underlayment type is usually best to use. If the laminate that you’ll be using already has an underpad built-in underneath it, you won’t need a separate underlayment anymore. Never double the amount of underlayment to use. Either use the underpad built-in with the laminate, if it has one, or one separate roll of underlayment. Using a thick underlayment by laying one over another will make your laminate flooring too soft and unstable.
You will also be needing some scrap laminate later, so collect any of the cut pieces from your laminate planks once you start cutting. These will be used during the installation as spacers for the expansion gaps between the laminate floor edge and the wall. The gap should be around 1/4″ – 1/2″ wide, and the thickness of the laminate is perfect for it.
Step 6. Decide on Which Direction You Want to Lay the Laminate Flooring
When it comes to the layout of the laminate flooring, there is no hard and fast rule to follow. You can go in any direction that makes sense to you. Just make sure that the planks are placed in a staggered manner. Avoid any of the shorter seams to line up as it will not only look unpleasant but it can also compromise the structural integrity of the flooring.
If you’re still unsure how to go about it, you can always follow the current direction of what your existing wood floor is in and in most cases, this will be the best direction.
Here Are a Few More Tips for the Laminate Layout That You Can Follow
You can lay the laminate flooring following the direction of the longer side of the room. This will visually enhance the length of the room, making it look longer than it is.

You can also follow the direction of the shorter side of the room. This will visually make the room look wider, and the length seems shorter than it really is. If the room is too long, this layout can help balance the proportions visually.

In most cases, just follow what suits your taste best. There’s no wrong or right layout when it comes to laminate flooring.
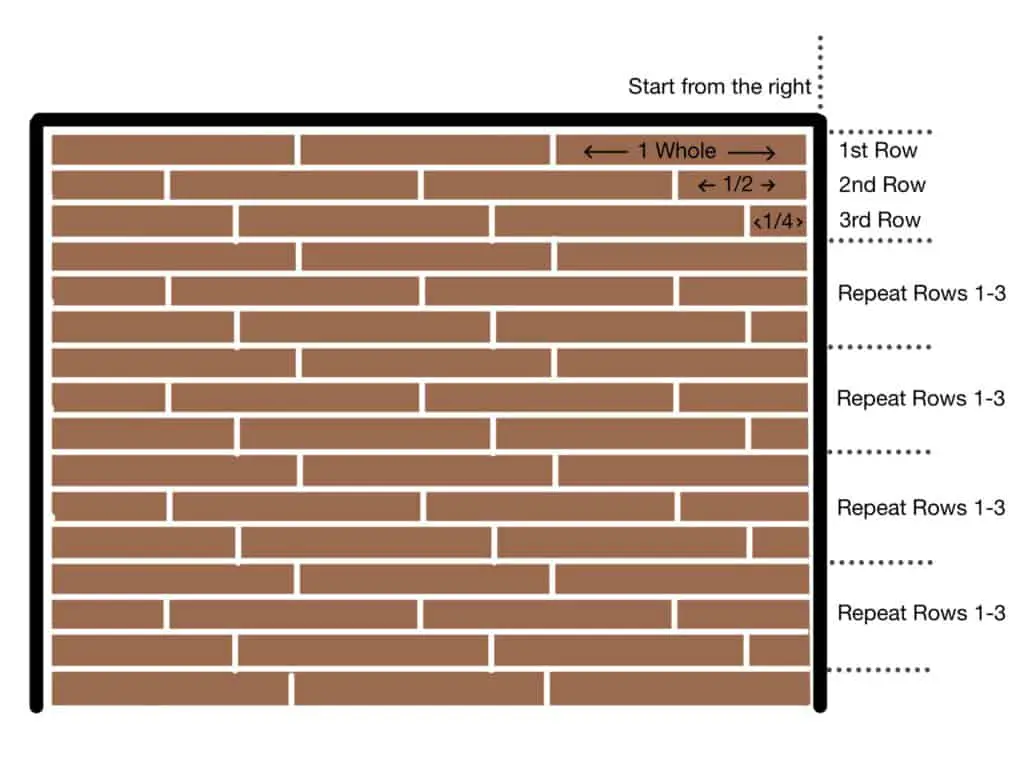
When it comes to staggering the laminates, there is also no hard and fast rule to follow. Just make sure that no two planks that are side by side have their short ends line up. Again this will not look good visually, and it can compromise the stability of the flooring.
Here’s a pattern that you can follow.
- On the first row, start on the right with a full plank.
- On the second row, start on the right with a half a plank.
- On the third row, start on the right with a quarter plank.
- From there you just repeat rows 1-3 on the next set of rows.

Step 7. Roll Out the Underlayment Over the Existing Hardwood Floor
If your laminate flooring already has a built-in underpad each plank, you can skip this step and proceed to step 8.
Once the flooring has been cleaned and cleared off, it’s time to roll out the underlayment. Butt the edges of the underlayment together so that they are touching and not overlapping. Then secure the seams with tape. Some underlayment will have a peel-and-stick adhesive attached to their edges which you can use to stick them together.
Make sure to cover the whole floor, spreading it flat, and to trim off any excess using a utility knife.
Step 8. Begin Laying Down the First Row of Laminate Planks
Start by preparing the first row of laminate planks by cutting of their tongues using your utility knife or any of your power cutting tools. This side of the planks will be the side that will be placed against the wall.
Following the pattern you’ve set on doing in step 6, start laying down the first row of laminate planks. Starting from the right side with 1 whole plank work your way slowly towards the left. Use your pieces of scrap wood to maintain a constant gap between the edge of your laminate and the wall or baseboard. The gap is necessary to provide the laminate flooring room to expand with changes in temperature.
Snap together the ends of the planks, making sure that they are tight. You can use the rubber mallet, tapping block, and pull bar to keep all the planks tight.
As you get to the other end on the left, the last plank would be most likely too long for the space left, so you would have to cut it short. Measure the length of the last piece you’ll need from the tongue end of the plank, taking into consideration the same amount of gap distance needed on the left side wall.
Cut the last piece with any of your cutting tools. Use a combination of your mallet and pull bar to get the last piece nice and tight with the rest of the plank row.
Step 9. Plan Out the Second and Third Rows of Laminate Planks, Following the Pattern You’ve Decided in Step 6
Doing rows 2 and 3 is pretty much the same with the exception of the first piece, on the right, being shorter than the 1st row. Whatever pattern you’re set to follow, finish off the 2nd row first, cutting the 1st piece of laminate plank, on the right, and then continuing with the 3rd row with a much shorter 1st piece. You can go back to step 6 and follow the suggested staggered pattern.
Step 10. Continue Laying More Rows of Laminate Planks
From this point on, it pretty much is repeating the same staggered pattern of rows 1 – 3. Just make sure that you maintain the constant expansion gap between the floor and the wall or baseboard. Use your laminate scrap wood as spacer to help you keep the gap constant.
If you end up on a side of a wall with a door trim that goes all the way to the floor, you can use an oscillating tool or a dovetail saw to cut it short. This way, you’ll be able to slide the laminate plank beneath it.
Here’s a video showing how this could be done.
Step 11. Install the Last Row of Laminate Planks
The last row of planks will most likely not fit the space that is left for it. You would have to cut it thinner along its width. You would need to measure the amount of plank you need for the space left, again taking into consideration the amount of gap between it and the wall or baseboard. Use a straight edge to mark a line on the plank to be cut. And then cut it using any of your cutting tools.
The last row may be a little bit challenging for beginners but although the space is tight, you’ll still be able to snap it onto the last row of planks. Use your mallet and the pull bar to help you to keep everything snug and tight.
Step 12. Install Molding Over the Gap Between the Laminate and the Wall
Once all the laminate planks are in place, you can work on one wall at a time installing a shoe or quarter round molding, or if you’re reusing the old baseboard, to install it back.
The molding will make the corner of the wall and floor look neater, and it will also hide the expansion gap.
Here’s a nice video showing you how a shoe molding is installed over the corner.
Step 13. Install Transition Strips Where the Laminate Floor Meets Another Flooring
Install a transition strip where the end of your laminate meets an existing floor. This normally occurs on a door way. Since your new floor will be a bit higher than the original flooring, it is possible that it will also be higher than the adjoining flooring. Make sure that the transition strip that you’ll be using can transition properly between the two different floor heights.
Transition strips will make the joined flooring look neater. It will also add protection to the edge of the new laminate flooring. There are several types of transition strips you can choose from and not all are installed the same way. Make sure to get the right kind of transition strip that will work well for your specific situation.
The video below will show you 2 types of transitions trips you can use and how to install them. The transition strips shown on the video may or may not be the exact type you need, so you might have to ask help with the manufacturer to tell you which transition strip type you have to use for your specific needs.
Step 14. Install Back the Doors That Have Been Removed and Adjusted
You can now install back all the doors that you’ve removed and cut-off a while back. Make sure all the doors are working properly and it’s not rubbing or scraping against the laminate door. Otherwise, you would have to cut it down again.
Step 15. Add Caulking to Neatly Fill up the Gaps in the Floor, Molding, and Trim Connections
The final step is to fill any of the connecting joints in between the laminate flooring and the molding and trims. Just fill in the gaps with a caulking just to make everything look cleaner. This step can actually be skipped if your connections were done very cleanly, the gaps are very small, and will most likely not become an eyesore in the future.
Good Video References on How to Install Laminate for Beginners
Below are two good video references for beginners to follow showing how to install laminate flooring.
The videos show the laminate being installed over different flooring materials though so follow step 1 of the list above first and then the rest of the steps are pretty much the same as how it is written from steps 2 – 15.
Here’s the other video showing steps 2 – 15.
How Long Does It Take to Install Laminate Wood Flooring?
For an average bedroom size, around 100-150 sqft or around 9-14 sqm, you can probably finish the installation in about 3-4 hours. This does not take into account the time to acclimate the laminate flooring and the cutting down of the doors and trims. If you’re a beginner, it’ll probably take you a whole day to finish everything.
How Soon Can You Walk on Laminate Flooring After Installation?
Most laminate flooring can be walked on as soon as the installation is done but you should always refer to the manufacturer’s guidelines regarding this as some may require the flooring to settle for a while before it can be used heavily.
All About Materials is a participant in the Amazon Services LLC Associates Program, an affiliate advertising program designed to provide a means for sites to earn advertising fees by advertising and linking to Amazon.com. We also participate in other affiliate programs which compensate us for referring traffic.

